HO HO HO!!! Merry Christmas, my friends! :)
I am SO incredibly excited to share with you the Christmas tree housed in Apt. 294.
[Oh, & meet Luna- Collin and I's baby girl!]
This is our first time decorating a tree together and, well, this is the result! We decided to this because right now we live in an apartment and don't have much storage room. No storage room yields no collecting holiday items. Boo :( But don't you worry… once we build our dream home, we will have lots of room for fun stuff!
{Shoutout to my fiancé on the whole Santa Christmas tree idea! When I was stuck with just the lights and ribbon on the tree, he came up with a simple idea that we both love!}
Again, I am really slacking and just getting used to this whole blogging thing, and I didn't take step-by-step pictures of how we made our Christmas tree… sorry! Luckily, this was not hard to make & didn't take too many supplies, so I will give detailed steps on what to do! Enjoy and post comments below with any questions or suggestions!
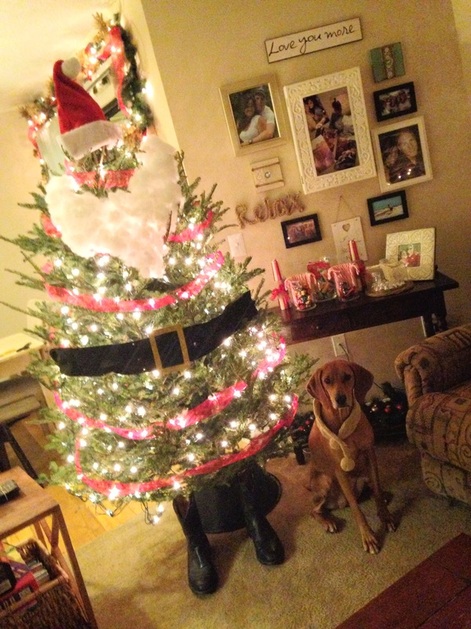
Supply List:
- A Christmas tree
- Christmas tree stand (Walmart)
- White Christmas lights- we use the netted lights… way easier to wrap around the tree and makes it look more uniform *props to my Mom on that one from back in the day!* (Walmart)
- Santa hat (Walmart)
- Red ribbon (Hobby Lobby)
- Black felt (Michaels)
- One 8'x10' sheet of gold styrofoam (Michaels)
- One small bag of Poly Fil (Michaels)
- A pair of men's black boots (our closet!)
- hot glue gun
- scissors
We're ready to set up and decorate your personal Santa Christmas tree! First, set up, water, and trim your Christmas tree (if you opted for the real thing this year!) Once you have decided where you want to put it in your apartment, house, condo- wherever your living quarters are!- it is time to decorate.
Plug your glue gun in to get it nice and warmed up. While your hot glue gun is warming up, we are going to work on the tree itself. Place the lights on your tree to your liking. You don't have to use white lights, but that's what we went with this year. Afterwards, wrap the tree with the red ribbon. The red ribbon represents Santa's famous red suit.
Next, we are going to work on Santa's belt. Take your black felt sheet and cut it to the desired thickness and length you wish. I cut the sheet long enough to where it wrapped around most of the tree, but they aren't touching in the back. Personal preference. Now, take your gold styrofoam sheet to make the belt buckle of Santa's belt. Cut a proportionate rectangle to the thickness of the belt. Hot glue this part onto the black felt belt. Wrap around the middle of the tree. Since my belt didn't meet ends, I just tucked the ends of the belt into the branches. Hold just as good!
The Poly Fil will be used as- you guessed it!- Santa's beard! Start filling the upper portion of the tree in a V-shape, as if Santa's face was at the top. Use as much filling and make it as large or small as you want. Don't forget to put Santa's hat on the tippy top of the tree! We didn't use a tree skirt this time, so we were able to place the back boots directly under the tree to give it the full effect. Turn on your lights and there you have it- your very own Santa Christmas tree!
xo.
<3 mm.
 RSS Feed